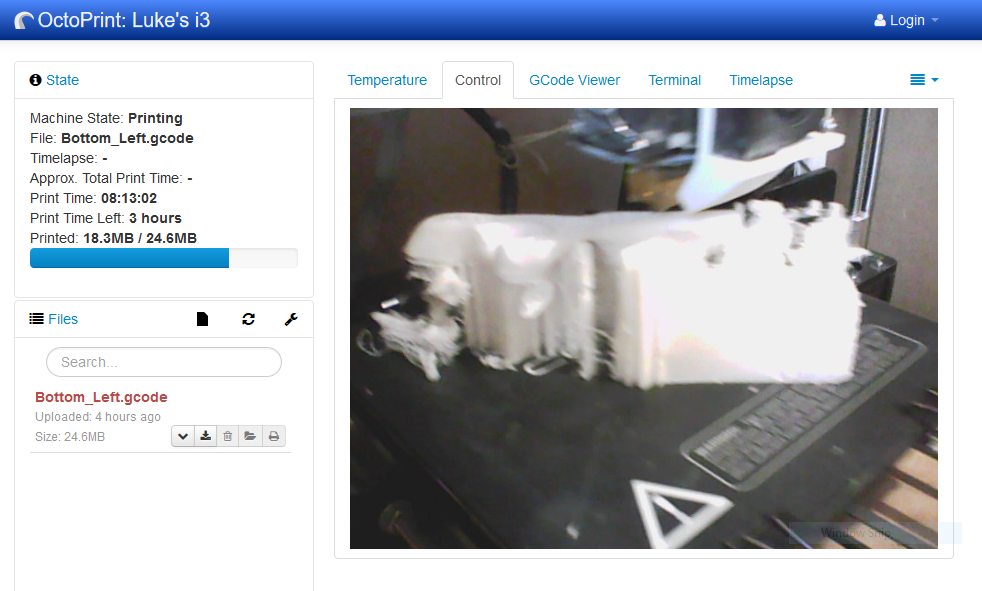
Well it seems the z hop I put into Simplify3d worked. Only 3 other prints to go
The piece I mentioned yesterday, that I thought was fixed to the model but suspected, now wasn't fixed to the rest of the model, wasn't fixed to the model.
Its the rib piece on the left in the photo which will be easy to glue back onto it when all the pieces come together.
Another angle of the print.
The round thing is a new filament spool holder for Blueprinted spools. well that's an assumption that all their spools have the same inside diameter.
It was based on Panoreth 3D Printing video he uploaded recently (at his age I was a clueless of just about everything) Suggested by Makers Muse.
I thought that looks like a good idea so I made my own based on looking at it in the video I didn't bother to download it from Thingiverse.
The centre hole diameter is 18mm and if you'd want a version that suits your spool holder let me know all the relevant dimensions and I'll run you off an stl.
As a side note my pei with high temp 3m adhesive showed up yesterday so I fitted it and started using it this morning. Adhered to my boroscilicate glass.
Things started well enough, here's the brim going down. The printer is a Zonestar i3 but the model before this one.
The build plate is borosilicate glass with Aldis' version of build tack for their Cocoon printer a re branding of the Wanhao i3 printer.
To quote the movie Stripes ".......and then, depression set in" :-D
This is the orientation it was printed and the print was going down really nice, except the supports I was using were the default ones and part of the model went un-supported and it failed.
So I tried again with Simplify 3d and used the default supports along with some custom ones I added in myself inside the program.
Again, it failed, a part was knocked over by the print head, possibly because I've taken the box I use as a heat trap off the printer for maintenance and because the filament is pla.
I didn't think it would be necessary. I think the pla warped up a little although that's just a guess.
Here's the piece that got knocked over
So...... this time around I'm trying a lot more supports and I've changed the orientation of the part
This is the model in Simplify3d and it's plethora of support
.............I'm not expecting success though, so I'm preparing for the fourth iteration
by using Meshmixers' support structures and or modelling my own back in 3ds Max or Blender
Edit.
I added a Z hop to the print to try and avoid the head crash happening again. It's only about 0.5mm
Well it's not printed just yet but I've finished with the modelling for the test print. I added a cavity but not the sound hole in this video.
There is no audio.
While I'm showing it here in Blender I used it and 3ds Max to model it.
The neck will be a bolt on timber neck that I'll make when the final print is done.
I may just drill small holes for the sound hole or use a forstner bit I have to make one large round hole. I wanted to make a set of crossed bones ala the Jolly Roger but booleaning these posed a few problems in the last iteration so I didn't even bother this time around.
This time around they are even manifold and have been sliced in Simplify 3d ready for printing tomorrow. Times look like 12 - 16 depending on the piece. They will be printed in glow in the dark pla blue and then glued together. The bridge will be a cut down Chinese one I bought long ago.
I am more than happy with the quality of the print the glow in the dark filament prints nicely. The problem I had was with the supports and they failed to do their job in several places.
I'm going to use meshmixer to add some supports before slicing in Simplify 3d to see if that makes a difference
This was my original design but I've yet to master slicing the areas I want they way I want. I believe that Simplify 3d will allow me to submerge a print into the print bed prior to converting to stl and should make a completely flat bottom of the print and its something I've yet to test.
Click on pictures to embiggen
Here's a quick turntable of the final design I went with, based on a poster for the Blue Mountains ukulele festival. I've had to cut the thing up into 4 sections to get it to fit onto the print bed. I'll glue it together later. This is being printed in pla glow in the dark blue filament. I intend to print it in abs when I've ironed out all the bugs and believe me there are a few, in a white glow in the dark filament.
The neck will be a traditional timber one with machine head and someone suggested I print some knuckle type of tuner buttons ;-D
A sound hole can be added later with a large forstner bit I have. Booleaning out something fancy was something that had me considering seppuuku, mainly because the design wasn't manifold booleans just hate that. So it's on the list its for the next iteration.
Here I'm printing the first prototype section and already running into plenty of issues. Simplify 3d didn't complain about the model not being manifold ie water tight no holes etc and despite not being manifold I was expecting issues, but I didn't count on the the supports being one of them, S3D is known for its good easy to remove support structure so I'll need to fix that.
I'm not sure how much I'll follow the poster design as a lot of printing design considerations need to be taken into account due to the 3d printing process. I will definitely go back and see if changes to the design can be made so it looks a lot more like the poster are possible.
The last say will be dictated by the printing process, and to find its limitations I need to print one first, so if I start to disappear up my own butt, you'll know I've found the ever present recursive algorithm that can be a part of trial and error design.
For example I wasn't sure I wanted the only connection between the pelvis and rib cage to be the spine so I've made them meet to support one another in my version. If I get braver I might try it.
Remember there is some considerable tension on the strings when in tune and while it would be funny to watch, seeing the thing fold in on itself might make me cry.
Please note: I haven't asked for permission to use the design yet which I'd ordinarily do but I don't want to disappoint if I fail, as this is all experimental atm :-)
I've been using every single piece of cad and 3d software I can as I've found out none of them are any kind of panacea.