Thursday, 28 March 2019

Wam Bam PEX 3d printing surface (P2)

I moved onto abs filament to see how well that stuck to the pex material. I'm going to perpetuate that old often used but inaccurate saying  "Here be Dragons" https://www.atlasobscura.com/articles/here-be-dragons

I dried some black abs I had here for 3 hours at 50c in my food dehydrator then re-printed the same warp inducing file I used in part one. https://www.thingiverse.com/thing:990484 At first I tried with nothing to help with adhesion and that turned out to be a failure. I was laughing too hard to remember to take pictures. It only got about 10 layers in when I discovered a spaghetti monster forming.

In preparation for this last night I made up some thin abs juice with some of the filament and some acetone so I schmeered it on the PEX just as I have in the past on pei and restarted the print. This time we lasted about 41% into the print before it started to lift on one end and then at around 60% it did the same at the other end.

I was very slap-happy with how I used the Juice and it wasn't an even coating at all, but despite this I never expected it to work all that well anyway and said as much in part 1.


Here we are nicely stuck down on the abs juice and lasting longer than without the slurry.


The part is still stuck at 41% of the print and with temps I felt I could use, or reach with my newish CR-10.

I did have it set to 100 but because it was taking so long to get to temp I went back and set it to 80 degrees and bumped it up as it printed to 90. I was about to raise it again but it was warping by then so decided not to. Would that have made any difference? Maybe? I doubted it though, with no enclosure which may not have even helped as this stl was designed to warp with these kinds of filaments. A reminder that pla didn't even think of lifting.


So conclusions.................and this wasn't very scientific but under my usual work flow of being too lazy to level every time or wait until everything had cooled down prior to evenly spreading some abs juice down on the surface etc

PLA = Brilliant

PETG = I think might be ok but it will depend heavily on the part you're trying to print and the addition of some kind of adhesion promoter like abs juice would definitely help. It did stick really well to the surface but still lifted in places. I tried to remove it while the bed was still hot and it resisted my attempt strongly.

ABS = Life too short to be trying abs on this surface, especially on a printer never really designed to handle it. The bed temps really need to be around 100-110 and the printer inside a heated chamber. Like petg though some parts might work but it will depend on their shape. If you can get it to stick then dont let a print designed to warp stop you from trying as the print finish was bloody beautiful. Find another way to get it to stick down you wont regret it.


Final print and while it cracked and lifted it was still difficult to remove from the bed saying that if I had of been more thorough with the abs juice and coated more evenly, the lifting might well have been so much less or not at all.

The cracks however indicate that my print temp was too low and my whole print room way too cold to print abs. So an enclosure and hotter print and bed temps for this roll of unmarked abs are needed.


On the right hand side you can see where there wasn't enough abs juice to help hold things down.

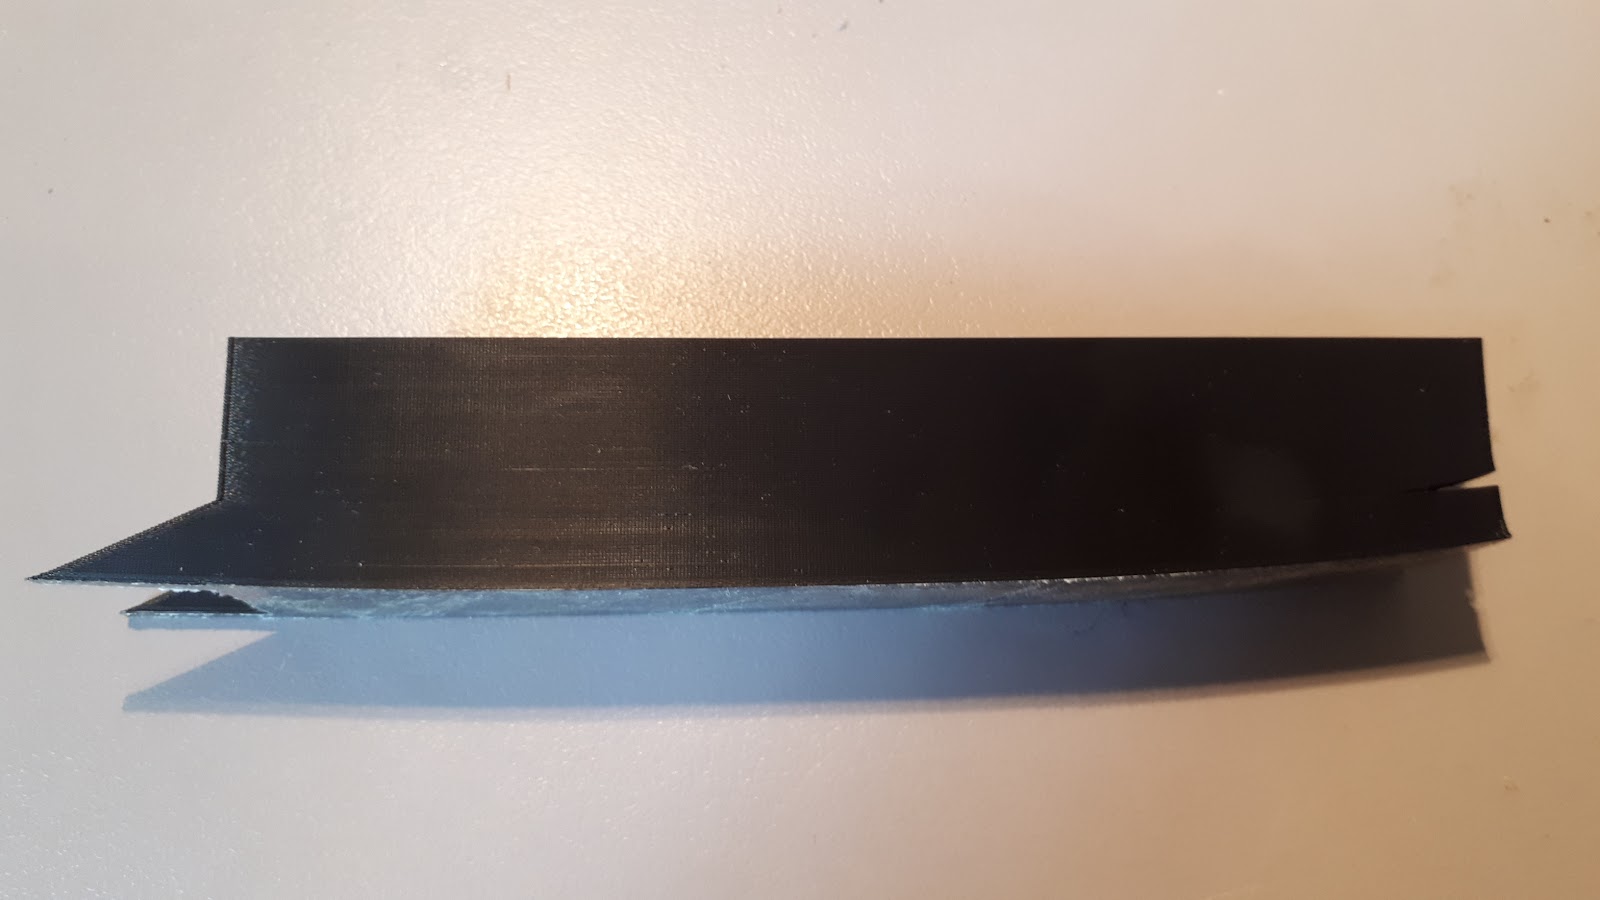


The print quality or surface finish is fantastic and if this stuff didn't come with so many other issues I'd happily print with it all the time.................for one, it is a lot cheaper than most other types of filament.

I'll clean this abs juice off after the print finishes just to see if it is affected in  any way by acetone etc. I doubt it will be, as it was touted as having better heat resistance than pei etc so I doubt hydrocarbons would affect it either, pei isn't affected by acetone or thinner etc.


All clean!!

I also lightly sanded the surface with some fine sand paper to rough the surface to assist with petg my favourite filament and one I'm returning back to soon. I'll do some more tests to see how that goes next, pla first to make sure everything is still good.

Please realise your results may vary to mine, my abs juice could have been too thin or a hundred other things ;-)


Quick pla test print after I lightly sanded the surface. Going to need some dynamite to remove this now lol .................or wait until it cools I guess, or pry it off with a tool of some sort. :-)


Wam Bam PEX 3d printing surface (P1)

I recently bought a Creality CR-10 that comes with a sheet of glass as a print surface. On my old printers I have pei sheets adhered to the print surfaces. These are all 1mm thick rather than the 0.3mm that companies like Prusa Research use on their Mk3 printers.

PEI is commonly used by Lulzbot and Prusa etc as it is a great material suited to high temperatures and its ability to hold a range of filament types.

So naturally I searched around the usual places for something to fit my 310mm x 310mm bed size and I found a reasonably priced Anycubic Ultrabase glass bed, so I ordered that. I was reticent though as my previous experience with this surface was hit and miss at best. After making sure my nozzle was very close to the surface I found with some practice I had reasonable success with it. You had to still be vigilant with it and keep an eye on it, unlike PEI, but it was ok.

I kept searching for some pei at 1mm thickness and 310 squared at a good price with some of the 3m adhesive but was coming up short in all areas. There were some thin sheets and some con atists from china selling buildtack in different colours and calling it pei but buildtack doesn't last under my heavy treatment and you couldn't give it to me for free to use.

I stumbled back onto Wam Bam flexible plate system that uses PEX rather than PEI. Not something I was too familiar with but had seen it before, after reading that is had some qualities above that of pei, and checking the bank account I decided to just get the PEX with 3m adhesive by itself as I couldn't afford the entire eco system. Not that is was overly expensive, my budget just didn't stretch that far having backed a kickstarter for another pei system and saving my money for that instead.

(nb Kickstarter just informed me that it didn't make the funding target)

https://whambam3d.com/collections/310mm/products/pex-build-surface-310-x-310

"Size 310mm x 310mm / 12.2” x 12.2”
We have developed the Wham Bam PEX Build Surface from a specially formulated polymer with a higher melt point than even PEI to attract most any filament without damaging the sheet. Prints easily pop off once cooled and flexed. Pre-backed with 3M adhesive so it takes seconds to install!"


The sheet arrive quickly and I stuck it to my sheet of glass that came with the CR-10. I also considered sticking it to the back side of the Ultrabase as well and it is still a viable alternative.

It was easy enough to stick down, although being clear, I forgot to remove the thin, also clear protective sheet covering it. Funnily enough it worked really well and the print stuck to it quite well. :-)

I finally cottoned on to what I'd done, removed the film, and started another print.

For pla this stuff is fantastic, prints stick really well, dont warp and just pop off when cooled down. I rarely wait for things to cool and still force it off before it is cool enough though. :-)


These pics are all of a warp test designed for pei sticking like a champ. This test print will warp if you just look at it incorrectly so I was happy to see it not lifting with some pla. https://3dfillies.com/plasteel-filament-175mm-1kg


Another test of a narrow coin holder that stuck well.


I moved on to some old PETG I had lying around to see how well it would stick to the PEX. It did warp up as expected but it was no where as bad as I expected.


I still haven't printed abs or asa on it as I still need to dry whatever I have here before trying them. To be honest I'm not expecting it to "not warp" off the surface but the good thing about pei and pex is that you can use an abs slurry on these materials and not harm them in any way and clean up is a breeze.

I also dont have a enclosure for this printer and will try to do these test before the Canberra Winter sets in. I'll crank the bed up as high as it will go and hope for the best. I'll repeat the tests with using a slurry of abs juice after that and will report back the results. For all I know abs might stick like a champ but I'll be using the same test print designed to warp so wont be holding my breath. :-)

This is not a sponsored or paid review in any way shape or form, but if you like to print pla, and even be really hap-hazard on how much effort you put into bed leveling this stuff just works like a dream, and out performs Ultrabase every time. Until the petg and using this warp test I didn't have any pla print come lose or even look like lifting.


Saturday, 15 December 2018

Stick Blender Splat Guard

I bought a cheap $19.99 Stick Blender (Big W) to primarily make my own home made healthier mayonnaise using free range eggs and either Olive Oil or Avocado Oil.

This guard was in response to my first use of this particular brand. I'd used one before but it didn't cover me, my t-shirt and kitchen surrounds in oil and egg yolk resulting in a 20 minute clean up.


Here's a link to the recipe I found, that claimed and delivered, a thick creamy mayo.

https://nourishedkitchen.com/avocado-oil-mayonnaise/


I got out my design pad and measured everything, then designed something that would sit flat on my printer bed for printing and not need any supports. Mainly because I was going to print in 3DFillies PLAflex so I could design in a slit in the lid, so I could fit and bend it around the stem of the blender.


While I have any number of print bases like Ultrabase etc I'm not that keen to swap print surfaces as that entails a Z-Stop adjustment and I really didn't feel like doing that. :-)

My regular bed is some Borosilicate glass with some pei glued to it.


The print turned out quite nicely...................after the 3rd attempt lol
It seems my math skills and ability to measure things and do it to a shape on half the of profile design to then lathe around 360 degrees was clearly lacking :-)
If you add 3 mm on one side the total width ends up 6 mm larger and while I understood this before I started I still got it wrong twice.

The container has a pouring spout that I needed to allow for and a lip around the top I took advantage of to make the lid clip onto.


Pei and flex material get on so well you actually have to put an intermediate layer of something like glue-stick so you can remove your print after it has finished printing.
While I did this getting the print off was difficult and left a mess on the print itself which I washed off with warm water. Due to my impatience with everything, the first layer didn't turn out as nicely as I wanted. It was acceptable to me as this is for my own use and if you know me you'll know I don't fuss so much over visual details and am more interested in nice practical design.

That's not to say it isn't a part of my goal but it also isn't the end all, or be all, of 3d printing as far as I'm concerned.


The lip snaps on with a satisfying click and is close enough to the lip to fit well and still allow spill free pouring. 

Note:- You couldn't pour the mayo I made, this stuff could fill cracks in plaster, it was so thick  ;-D


You can see the split where you can bend it to fit onto the shaft of the blender.


It has yet to be used in a real life mayo making frenzy but I'm pretty confident that all the cleaning and the load of washing machine clothes and Tea towels has been a lesson that not all stick blenders are the same or even act the same. The other one I once used, required you to lift the blender way too high to make such a mess but this one doesn't really need the same kind of lift to do the same job lol


For something that only cost $20.00 aud  and will only get used occasionally I'm pretty happy with everything now!

Link to the stl here

Thursday, 29 November 2018

3d printed and airbrushed Raspberry Pi Case - Part 1

Based on the Raspberry Pi 1 case design in the link below, I redesigned a Raspberry Pi 3 case as it seems the Series 1 case's link to MyMiniFactory no longer works. It also is out of date and doesn't fit the new Pi's.

https://www.fabbaloo.com/blog/2015/7/30/design-of-the-week-raspberry-pie-case?rq=raspberry%20pi

Designed and modeled in 3ds Max.
Sliced in Simplify3d v4.0.1
Printed in 3d Fillies pla+ Green https://3dfillies.com/plaplus-filament-175mm-1kg/


The mesh needed to be manifold so the long process of weaving the crust as one solid water tight mesh began.
I avoided trying to boolean the sections together for just about every reason you could reasonably think of.


The hump or raised centre section was added using soft selection and a FFD modifier


The weave and the outer edge were bought together and Booleaned into one mesh
and while it isn't shown here, because at the time I was too deep into my process, it was then sculpted into the shape I wanted.

I just used simple box modelling techniques for most of this and added turbo or mesh smooth modifiers to get the rounded soft pastry look :-)

Called box modelling because it all starts with a box........no less.


A bottom was made for the top in Fusion 360 and imported back into Max to be mated with the top.


My logo was added on the bottom to satisfy my ego :-) and to help prevent someone passing it off as their own work. Something that the long long hours put into all of this, wont let me tolerate :-)


Here you can better see the sculpting and smoothing to remove the boxiness of it all


3d printed and airbrushed Raspberry Pi Case - Part 2

I used 3ds Max for most of the modeling and design.


Forgot some settings and had a hard time removing supports lol
Fits like a dream :-) now...........!


Because I was painting these (There were 6 of them to allow for mistakes) I printed them in 3d Filles pla+ Green  https://3dfillies.com/plaplus-filament-175mm-1kg/ as any colour would do.

You could easily have used white or another light colour that would match the top coat but I have years of experience painting things and knew I could cover the green.


A combination of Beige and grey Primer Filler were used to undercoat and fill the layer lines. I found the beige was a little better for this. I started with the grey then switched to the beige.

2 full cans ended up being needed to get the layers covered, with plenty of sanding in between.


The final colour was a beige automotive acrylic lacquer that was close enough to what I was after for my base colour. 3 cans of paint so far. Two undercoats and one top coat.


I rendered the top of the design in 3ds Max and scaled it to the correct size.


I then glued the paper with some spray adhesive to some card stock.


Then I drew around the inside of the raised sections that would get the darker colours
and cut them out with a stencil knife with a No 11 blade in it.


I printed the size of the width of the "pie" on the A4 paper, because I kept forgetting it :-) 102.3 mm


I then scored the card and folded the wings down to form a tent above the case so as not to touch the cases themselves.


I then airbrushed a combination airbrush water based acrylic paint and some ordinary acrylic artist paints I already had here. This allowed me to mix up any colour that I needed to.


There were about 5 or 6 colours used in the end to get the look I was after. The first 3 colours were all freehand painted without the mask and quite randomly applied.

The next 2 colours I used the mask to prevent paint from reaching the places I didn't want any of the darker colour to hit.


So working from lightest to darkest with creams and yellows and umbers and browns I built up the pastry to look nicely cooked and even a little over cooked.

The last and darkest colour was hand painted freehand with my airbrush.


When everything had dried, it was going to need a clear coat. This was always something that was going to happen as the water based paint over the lacquer was never going to adhere all that well and was going to wipe off during handling. Not easily, but over time if left un-coated.

So I used some picture varnish designed to go over both types of paint to protect artwork. Luckily I had this from other art projects.

There are some paints designed to do this and used a lot in the airbrush industry, but were way too expensive and I only needed a small amount so settled on this instead.


Here they are with a raspberry Pi fitted inside one of them. I had originally increased the scale of these by another 1% to make sure the RPi3 would fit comfortably.

The test fit prior to painting was fantastic so I plowed on ahead "Mr Plow!"

After they were painted they were much more difficult to fit in the cases. I suspect the 3d prints were still off-gassing and shrinking while they were waiting for paint and also were contracted even more by all the coats of heavy paints that followed.

The RPi3 still fit, but need to be patiently fitted into the case.


I have kept one of these for myself, one went to a friend who let me borrow his compressor after mine decided not to work

All the others are destined as Christmas presents for close friends that have supported me.over the years.