Monday, 30 May 2016

From photos to 3d model using Autodesk Remake

Having read about using photos to make a 3d model some years ago, I searched and found a lot of information on what programs could do this and asked the question "just how good are the results?"
I'm finally following up on this and running some tests on Autodesk Remake.

A few programs you'll all know automatically with 123 Catch for mobile phones being pretty much the main one.

Autodesk was working on Memento a while ago and it has finally been released into the world as ReMake I spent 30 mins today while waiting on a new belt for my 3d printer to arrive, (it didn't, maybe tomorrow) and took it for a test drive.


Some years ago I was given an old man statue by a friend making fun of a certain milestone birthday. It has seen better times and is quite beaten up and is used as a door stop these days and I figured it would make a good test subject.


I'd been saving for a tripod for my Canon 60D to do this very thing and at $70.00 + for anything decent, I never thought the day would come, as it was a low priority.....until I went to the communal dumping area in my units. I found a tripod sitting there, I expected it to be broken.
To my childish excitement (a happy dance may have been seen by anyone looking on) it was in good condition and has now found a new home at my place. Why you'd throw something like this out despite its age rather than sell it is beyond me.

This was the very thing I'd been waiting for, I now had a turntable/carousel for painting etc and the tripod I needed to control the way the objects would be captured.

My most recent goal is to scan my own head and save it in my 3d program, 3ds Max, so I can make sure it will fit inside helmets of any description like my Cyberman helmet, the first one, was too small for my fat head and this will, I hope, allow me to use my scan to then modify the size of things like this in the future so they fit my or anyone's head.


I marked my painting carousel into 8th's and marked a point on the side so when turned it I could make repeatable stops around the object being photographed. My tiny kitchen really doesn't have the room need but I made do. It's lighting was extremely suspect with only a bulb and window light. 

I reset my camera from raw to jpg as I didn't want to be farting around with huge files and having to convert them for upload to ReMake.

Autodesk Remake, can do the calculations of the photos on your machine, or in the cloud. I hadn't checked if my system could handle it and carried on regardless. Long story short, it couldn't, not enough Ram apparently, so the cloud, it was.


A total of 41 photos were taken 8 around the base looking up, 8 a little higher 8 about level, 8 higher still starting to look down and 8 looking down upon the head. Where I got the last one from is any ones guess. lol


I loaded in the 41 photos and sent it off to the cloud and waited about 10 mins or less as I wandered off to do something else and when I got back this was the result.

A fully complete scan of my statue with a hole in the base that had left because the software realised it was the object the statue was sitting on OMFG!

A gap was missed between his legs, something I should have planed for but I love to plow on in without instructions, to see just how intuitive the interface is etc

After playing with some of the settings to make the background dark and a measurement box around the statue. I am stunned at just how good the software is as picking out the object and rejecting the back ground. My camera settings were just slapped into the camera so it wasn't over or under exposed and very little thought was given to it on purpose. 


The results are fantastic at first impressions and here is the resulting file for you to load into your copy of remake (I put that I was a mentor and not for commercial use) which is true, so I didn't have to part with any money I don't have anyway.

When you consider just how little effort I put into setting this up in every way it is bloody amazing. More tests to follow along with reading the instructions and looking at the tutorials lol

Any suggestions of what to try and scan next?


File: Test_1


Some alternative solutions

http://wedidstuff.heavyimage.com/index.php/2013/07/12/open-source-photogrammetry-workflow/

https://en.wikipedia.org/.../Comparison_of_photogrammetry...

Agisoft Photoscan: http://www.agisoft.com/
Acute 3D Context Capture: https://www.acute3d.com/
Reality Capture: https://www.capturingreality.com/Prod...
Pix4D: https://www.pix4d.com/
3DF Zephyr: http://www.3dflow.net/


Friday, 27 May 2016

Skeleton Ukulele and printer modifications update

Replaced the perspex sled on the printer with an aluminium one. The sled had the linear bearings screwed to it. The new one can be seen fitted to the printer.


I modified the mounting so it takes two fans. I figured that using Toms idea of a pancake stepper motor gave me a saving in weight I could afford to add it.


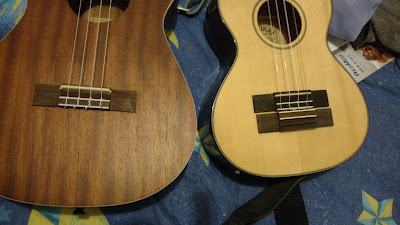
The skeleton uke will be a Tenor scale length the same as the Lanikai in this picture.


I'm not sure I like the new one or if the area where it will be joined will be strong enough it does seem a little small.


 My poor finger really copped a deep cut trying to shorten the ptfe tube which caused me to rip off the thermistor wire.


Monday, 23 May 2016

Changing the Hotend and extruder on my 3d printer


My modifications to the Titan Carriage.
The fan on this design that I downloaded from E3D for my I3 is at the back of the carriage and I've added another one to the front based on watching this video. http://www.desiquintans.com/coolingte...
I managed to break the thermistor d'oh! and had to order another one.

I finally got around to buying something that will get around having a broken audio jack on my laptop, so if everything works out, I should be able to post with some Audio soon.
The modified files Titan files are available for download here:
https://dl.dropboxusercontent.com/u/6...


Wednesday, 11 May 2016

Skeleton Ukulele V2

I spent a couple of days redoing the Skeleton Ukulele and made it a lot simpler and fixed the area the neck will sit.


Saturday, 7 May 2016

The Skeleton Ukulele has finished printing

So I finished printing last night and this morning glued it together.
I'm using my old soldering iron to smooth out and weld some of the gaps and obvious joins which explains some of the black marks which is carbon from the iron despite cleaning it quite well.


Top

Back


I didn't leave enough room in the cavity for the neck to sit into but I can cut some more out with my Aldi dremmel or cut/drill a slot into the neck area going back into the cavity along its length using half the height on the bottom to slide more timber into the body.


While I'll keep working on this I'm going to go back into the files and redo the design so things are a lot simpler and it is all one object, rather than the squashed together nightmare it turned out to be.

I maybe able to just bring it into software I own and just retoplogise it so it isn't the dense mesh that was turbo smoothed into the non quad mess it ended up.

I may try and make it more like the poster but we'll see :-)


The real ukulele is my tenor uke place there for size comparison.
The bridge will be cut down to width, hopefully the reduced surface area doesn't impact the gluing strength. (You know it will lol)
The fretboard is a cheap Chinese tenor one I bought out of curiosity a while ago, and whether i'll use it for this I don't know yet, after all this is a prototype and may not progress much further than this.


Friday, 6 May 2016

Woke up to broken ribs!

;-D Well my print did.

It was a print that took about 16 hours to finish and I woke to find that a few of the ribs were misaligned/Broken. Nothing that I couldn't fix but the resulting joins was pretty obvious which for something I would paint not a problem..........but this is Glow in the dark filament and that would defeat the purpose.


Click pictures to embiggen


The whole design need re doing as I went about this the wrong way I think.
Being a frustrated perfectionist I set out to model and extremely accurate skeleton then in trying to reduce my workload and boy was there a lot of work involved I scaled and crammed the thing into the shape I wanted, not really re modeling bits so they were one whole component. Big mistake in hindsight. I should have then  retopologised the whole thing to make a simpler mesh, something I might do in the next version if this one doesn't put me off making a next one that is.


There were holes to the left of me, hole to the right, stuck in the middle with what I printed.

In the end I think it will work as a ukulele it seems strong but needs redesigning before it could weened and be let out into the world. People wouldn't want to spend the time fixing everything I've had to fix.


I'll keep going and finish it of course as like anything you bring into the world yourself, you know and see all its imperfections and the casual viewer doesn't have a clue.

The 4th piece prints as I write this so tomorrow I'll get a chance to join it all together provided nothing else goes wrong.


I was running octopi and for reasons I don't understand my router lost connection with it mid print and I had to start again using the sd card. Now I can't get the ip scanner I have, to even see the address of octopi. It's normally dynamically addressed a random address and I haven't tried to fix one down within the router because of my lack of knowledge and thinking "Arrr fuck it" I'll just find the new address each time "its not hard" I'm  not certain why it has completely lost octopis' address but it could be my iinet router Bob fucking up as it has a built in  answering machine that I don't use and I have turned it off but it continuously turns itself back on at random times and at 2am in the morning announces in a very loud voice that it is now turned on or rings like a phone waiting for someone to pick up (it has naked phone as well).


Thursday, 5 May 2016

Skeleton Uke

 The third piece being printed


What I don't like, is the seam that I end up with because I have to divide the body into 4 so it will fit on the print bed. Here I've glued it together.


I'm going to try friction welding on the seams later when the glue has dried to see if I can't hide the joins a bit.


E3D Titan preperations

A while ago I ordered an E3D Titan extruder based on Toms recent video. I'm, getting ready for its arrival by printing some bits and pieces I think I might need. A 2mm spacer is required between the Nema 17 stepper motor and the  extruder so I've print a few things I could used.


Like in Tom video I'm going to try the pancake Nema 17 to drive the extruder. A link is available on Tom site or if you're in Australia you can use http://au.stepperonline.com/stepper-motors-nema-17-stepper-motors-c-1_21.html


Tuesday, 3 May 2016

Skeleton Uke Progress

Well it seems the z hop I put into Simplify3d worked. Only 3 other prints to go
The piece I mentioned yesterday, that I thought was fixed to the model but suspected, now wasn't fixed to the rest of the model, wasn't fixed to the model.

Its the rib piece on the left in the photo which will be easy to glue back onto it when all the pieces come together.


Another angle of the print.
The round thing is a new filament spool holder for Blueprinted spools. well that's an assumption that all their spools have the same inside diameter.


It was based on Panoreth 3D Printing video he uploaded recently (at his age I was a clueless of just about everything) Suggested by Makers Muse.

I thought that looks like a good idea so I made my own based on looking at it in the video I didn't bother to download it from Thingiverse.

The centre hole diameter is 18mm and if you'd want a version that suits your spool holder let me know all the relevant dimensions and I'll run you off an stl.


As a side note my pei with high temp 3m adhesive showed up yesterday so I fitted it and started using it this morning. Adhered to my boroscilicate glass.

Ohhhh Shiny!!!


Monday, 2 May 2016

3d Printed Uke Fails

Things started well enough, here's the brim going down. The printer is a Zonestar i3 but the model before this one.

The build plate is borosilicate glass with Aldis' version of build tack for their Cocoon printer a re branding of the Wanhao i3 printer.


To quote the movie Stripes ".......and then, depression set in" :-D
This is the orientation it was printed and the print was going down really nice, except the supports I was using were the default ones and part of the model went un-supported and it failed.


So I tried again with Simplify 3d and used the default supports along with some custom ones I added in myself inside the program.


Again, it failed, a part was knocked over by the print head, possibly because I've taken the box I use as a heat trap off the printer for maintenance and because the filament is pla.
I didn't think it would be necessary. I think the pla warped up a little although that's just a guess.


Here's the piece that got knocked over


So...... this time around I'm trying a lot more supports and I've changed the orientation of the part


This is the model in Simplify3d and it's plethora of support
.............I'm not expecting success though, so I'm preparing for the fourth iteration
by using Meshmixers' support structures and or modelling my own back in 3ds Max or Blender


Edit.
I added a Z hop to the print to try and avoid the head crash happening again. It's only about 0.5mm
but should do the job.