Thursday, 28 January 2021

Getting Back into Archery and 3d printing accesories for it

As the title says I've been slowly buying new Archery equipment. I took it up in 08 and shot for a while as I thought it would help my mental state then stopped in 09 ish. It turns out my gut feeling was correct and ex forces people who might need to de-stress have it recommended to them as a way to take their mind off things.

The first thing I wanted to do is to make some Beiter Limb alignment gauges by copying a set I borrowed off someone from my new club https://www.facebook.com/TuggeranongArcheryClub alas I couldn't find anyone to lend me some that I could trace or photograph or take home so I could use my vernier calipers on, taking their measurement :-)


Image stolen from https://www.canadaarcheryonline.com/collections/bow-square/products/copy-of-beiter-tri-liner-tool


These help you align the limbs to the riser and your string in a straight line down the centre of the bow.


Since I couldn't borrow a set, I just used their principle to make my own and they seem to work fine if a little fiddly to take off.


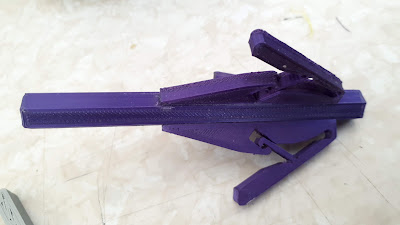
Then I made a way to carry my new arrows so their vanes / feathers didn't get damaged while transporting them. As it always does, I took a few attempts to get the design right, but I'm very happy and way too excited over this design. :-)


Printed in some old black petg I got from 3dfillies.com The test prints were all done in PLA in some nice colours using the end of rolls of mostly 3dfillies and a roll of esun filament that never seems to end lol. The old esun predates most of the fillies stuff as I didn't use it that much after discovering 3dfilles filament.


One print at each end works so well, and way stronger then you might think ;-D


The bundle of 12 arrows then all fit into an Australia Post mailing tube. The end caps had some open cell foam hot-glued onto them for added protection.


I painted the tube with some acrylic paint and it all turned out better than I could have hoped.


The new bow is a 28 lbs Recurve bow with a WNS Explorer DX Riser, WNS Elite Fibre / Foam limbs. All coming in for a 68'' bow.

Tuesday, 16 June 2020

Blog update 16/06/2020

2020 sheech what a terrible year :-)

Not much going on as my main printer had a heated bed issue and I've been lax about fixing it.
This will get fixed but I'm taking some time to take a break from 3d printing and moderating facebook pages etc

This has been great so far for  my mental health and should have done it much sooner.

I keep a diary of ideas and projects that I will get around to soon. I still have a model I need to paint and mount that suffered in the procrastinating :-)

I might dig out the Prusa clone printer I'm building and see if I can get that up and running as well.


Saturday, 20 July 2019

AirBrush Paint caddy from empty filament spool that doubles as a turntable for painting

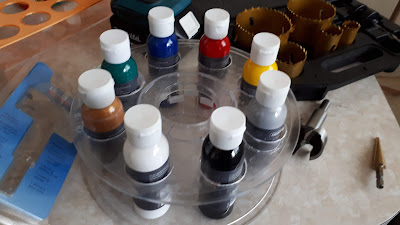
This project started life as a way to use up some spare perspex I had laying around and to get all my old Createx airbrush paint out of a cotton bag.


I'd just bought some more paint from a local Aldi on a whim and had finally gotten around to fixing the blown capacitor on my compressor.


Here's the first idea I was working on that used the spare perspex. My mistake was, and would have been easily fixed, had I continued on with it, would have just been to make the 3d printed top a lot thicker so it didn't flop down and bow.

This disappointed me, but that's what you get when you're prototyping, and trying to save on filament use, I guess.

Polyalchemy Elixir pla Orange from https://www.phaser3d.com/


Not a bad idea and it fulfilled the criteria as a paint caddy I guess, but it wasn't giving me that excited "I'm on to something here" feeling, so I tried something different.


Despite using a larger nozzle on my 3d printer, It still used a lot of filament and still wasn't exciting me, So I thought about using the empty spools of filament that everyone who 3d prints, has lying around. Throwing out plastic has always concerned me!


I found an empty roll from a now sadly out of business, and used a number of tools to drill holes into what I decided was going to be the top of the spool when laying down on its side.

This then got me thinking and the possibilities and excitement began


It occurred to me that with as many small bottles of paint I now have, I would be wanting to make a few of these and since I usually use pretty much one brand of filament these days

https://3dfillies.com

I focused on this one brand


I would need a way to join a few of these spools together and then I got kind of side tracked,
Compliant Mechanisms had just mad e splash on the scene and had me hooked.

The idea that I might be able to use a compliant mechanism to join two of these rolls together along with a carrying capability to allow the centre of balance to work to my advantage.

After the usual hours of drawings to get my head around the concept I settled on three designs to try.


The idea was that the prong would be spring loaded? ganged into threes and push into the hole in the centre of the spool. A hook and eyelet would be screwed into each end so they could be chained together. This would allow you to carry and not tip or spill any of the bottles in the caddy.


After a lot of test prints, I decided that I'd indulged my idea for way too long and went back to an earlier idea I had brushed off, to indulge my Compliant Mech designs.

I then looked at ways to drill the holes to accommodate the paint tubes and this is going to depend on your brand of paint, or whatever it is you want to store, and the size of the bottles.

I looked at three way to make the holes, but this depended on what I had, that was even close to the sizes I needed.

1. Hole saw kit i have.
2. Forstner bit
3. Christmas tree bit also called a stepped bit


While I settled on a hole saw it was mainly because I had one size that suited both my bottle sizes. I would certainly suggest a stepped bit if you can find one with a good range of sizes and practice learning how to set the stopping point, if you aren't going all the way through with one.


It was about now that I realised this would probably work really well as an idea and it dawned on me that I had only one of the clear spools, and decided to make this exclusively for the 3d Fillies spools because I have so many that are nearly empty now.

This decision now dictates all my measurements from this point. You would need to modify the files I will eventually upload to do this for another sized spool or just copy the design idea.
I got out an empty black Fillies spool and using a heat gun easily removed all of the labels.


First off, I used my caliper to find the right sizes of the spool and committed it to paper.


Then off into Fusion 360 to model up the spool which I can no longer find in the fusion cloud lol I do think I might have it exported and saved on my laptop but I've yet to check that. edit yep got it phew! :-)

I got another 2 holes in the design and went from 8 on the clear spool to 10 on the black.

You could, if you're able to use a pedestal drill and some wooden supports, be able to fit in more at this size or smaller if you are careful and have done this kind of thing before.


Then I took a screen shot of the face of the hole pattern and brought it into Affinity Photo, my photoshop equivalent and scaled it up to the size of the actually roll.


Then I used a light spray of some adhesive I have, to coat the back of the paper after printing it out, and stuck it lightly to the spool.

I then used an awl to poke some holes in the centre of each hole that needed drilling then using a small stepped drill bit I made some small pilot holes for my hole-saw to be guided by.
I drilled all the holes then cleaned up the sharp edges left behind with my de-burring tool.


Now back into Fusion to design the turntable part of this design.

The thread that make this modular are a real pain and causing me no end of trouble as they need to be customised to suit the diameters I'm needing.


The spool sits about 15mm above the base and only extends to the  depth-extent of the spool and this is where the first thread is.

The yellow print in this is the second stage, and has two threads, male and female to which the base and the top, or another section, if needed is screwed on before adding the top which will also have a small handle.


Purple PLA https://3dfillies.com/plasilk-filament-175mm-1kg


Yellow filament is some old Blueprinted pla I had. I tried searching for their new name and address but nothing is coming up so I'm assuming they're closed down now


Both spools spin beautifully and I do have some video but its too large to upload. (Read as lazy)

I've now designed and am ready to print the top which has a handle but I'm still reprinting the main section (Yellow in photos) that would be the one reprinted if you wanted to stack more spools.


I sorted out the threads and they now work without a lot of sanding etc.

I realised you could get to the lower spools contents by simply lifting the top spool doh! This means that the 80mm gap I left between spools could be lowered .... I haven't checked by how much yet though.

You could use the top handle print just on the one spool as all the threads are the same.


I looked quickly at other paint bottles available and found that many of them are even smaller and some kind of mods would be needed to accommodate them or simply dedicate a single modified spool to the smaller bottles. Still a bit of work to go.

-------------------------------------------------------------------------------------------------------

Here are some fantastic Australian airbrush paints that will go on a wide range of surfaces and take a wide range of clear coats.

https://www.airbrushasylum.com.au/store/c69/Trident_Colours.html


More information on the Trident range of airbrush paint.

https://youtu.be/VJbK8B8btos


_____________________________________________________________

Needless to say you could make this to suit anything and not just airbrush paint :-D


Added another layer :-) Found out you could store or use to feed filament to a printer lol

If you go higher I'd increase the size of the base inside the fusion file from the 130mm to say 200mm


NOTE: This is still a WIP and the files are subject to change on a whim!!!
Attribution Open Source as usual.

Here are the files for you to play with if you got this far.

https://www.dropbox.com/s/xygkk7tbsh1k5zt/Airbrush%20Tray.zip?dl=0


The duality of this design
Using just the base and a spool you can also turn this into an airbrushing turntable for small to medium sized items.

This video is showing them being turned into a turntable for some air brushing. More work would be needed, like attaching something to either side like a  circle of mdf and screwed to stop it from coming off. I'm thinking 6mm mdf not the 12mm I show here. But that would be up to you.


Friday, 31 May 2019

Creality printers, their cooling fans and ducts Part 2

Chuck just released a follow up to the fan duct video that this blog post was discussing.


His main point I think, was that his Cura profile for pla made the most difference. He is most likely right about this as the video evidence shows and you can't fault him for this. He goes on to talk about Chris Riley and his own follow up video about Chucks results, and posits other takes on what is going on.

Chris uses tape to block the flow and this was one of the options I suggested in Part 1. I didn't even consider tape for it in this location though, I was thinking to place it over the bottom third of the face of the fan for testing lol.

My mind was stuck on designing and making a solid set of partitions for everything. D'oh!
(Slowly licks closest window, while
drooling heavily lol)


My own issue and focus still, is that if you're only printing pla then you probably wont need to take this research any further. My continuing issue with it, is that profiles etc, dont always translate over to other filaments like petg that are often fussed over in trying to get them correct and string free, and I suspect this applies to other types of filament as well.

Not being able to control what and where things are being cooled limits you and reduces the control you have over the process.

You only need to look back to how the Prusa extruder is set up and how it works with target specific fans doing different jobs individually. This gives you more control, and I prefer this thought process.

I haven't looked at the
Hero Me Fan Duct closely yet, but will find it and link to it in here so everything is together.

Here is the general search on Thingiverse on the "Hero Me by
mediaman" as there are a number of revisions and versions with extras etc

https://www.thingiverse.com/search?q=Hero+Me+Fan+Duct&dwh=45cf1a7c676d06

Here is the OEM or original Creality extruder setup with a leveling probe allowance.

https://www.thingiverse.com/thing:3317985

Here are the two I'm thinking of as they match whats going on in my addled brain atm

https://www.thingiverse.com/thing:3182917

https://www.thingiverse.com/thing:3092044/


I think the only thing to do at this point is to print the Hero Me files and test it out on my rig, and test some petg with stringing tests, to see how well it works.

I also have some spare e3d v6 direct drive setups and a Titan extruder that I could take off one of the other printers. One is already half disassembled right now anyway, and make a design for them, but lets not have another unfinished project laying around right now lol

Wednesday, 29 May 2019

Creality printers, their cooling fans and ducts Part 1

A few weeks ago I watched Chuck Hellebucks YouTube video about whether you need a cooling fan on a Creality 3d printer.


He discovers that the heat Heat Sink cooling fan, as opposed to the part cooling fan, is doing more than is asked of it and the overflow of this fan is cooling your part to the point that your part cooling fan isn't really needed.


As you can see in this picture the front fan at this size is covering not just the heat sink but is also blowing on the heat block as well. You really dont want this as it cools your heat block, which is a bad thing, making it difficult to trust your temperature settings, along with forcing your printer to compensate unnecessarily for it.


It isn't difficult to see that the overflow of air from this will also be hitting the part being printed as well.

This is not a good thing and a bad design choice as it takes away any control from you, and makes adjusting settings very difficult.

In the following pictures you can see a Prusa mks 2.5 extruder housing with the components they use, and the layout they chose as well.

The smaller Heat sink fan (On the left) is only blowing onto the Heat sink and the overflow isn't providing the same amount of interference to the part as the Creality. (Some overflow would be expected though)

The much larger part cooling fan with its directed duct on the front (In this case a modified duct to surround the part a lot more)


I'm not sure if you can make it out in the next photo of the Prusa clone, but the heat block itself isn't really receiving any direct air from either fan.


The problem with the Creality setup....

Is that the excess air being blown over your part, makes it difficult to control each aspect of the printing process. If you can control all aspects of the process then you have options where you can adjust and fine tune your print process.

In the following example I used my experience of my old i3 in setting up some (Very old, and had to dry is for 2.5 hours at 65) petg, to print a new duct for my CR-10 in order to try and take back some control of this process.

As you saw in the previous pictures, I modified my old Prusa i3 clone thing, with their extruder setup and found that with this, I could cool petg a little on about 20% to help with stringing and it worked really well after testing some settings.

Unfortunately the CR-10 forced me to turn off the part cooling fan altogether, and despite doing this, the Heat Sink cooling fan, was blowing all over my print causing it to lift away from the bed causing it to warp up.

Controlling stringing would have been a bloody nightmare on a lot of other more complex and larger prints as well. So we need to find a solution to this.


This tiny little part was always going to be the small kid, picked on by the school bully, and sure enough, even with the part cooling fan turned off, the part warped.

The section that did warp was a victim of its own design and too many years of experience in the back on my mind, niggling at me telling me it probably would.

Solutions
Apart from turning off your part cooling fan the thing you can do to help with this, is to re-orient the part that is most likely to warp, to be facing away from the front of the fan and bed (Not always possible though).

So rotate to avoid the aggravate :-)


This warping isn't excessive either, and could also be fixed with a heat gun and a flat surface. The point of all this though, is that I dont have the control I had before, and don't like this one little bit.


Once the new part cooling fan duct is attached to the printer (Printed in White Petg here) you can see where it lifts from the side. In this case and only good thing about this, it is better than it pointing down into the path of the printed part threatening to knock the print off the bed the moment you walk away.


The question is "What do I do, to fix this?"


1. Use a smaller fan similar to the Prusa and to model a modified mount that fits the existing steel housing for it.

2.
Block off some of the airflow along the bottom of the fan so it doesn't blow onto the heat block ie some kapton tape, placed across the bottom 1/3 of the fan. ???3. Block off the two fans with partitions so each one is only blowing where we need it.

3. Redesign a brand new metal shroud to accommodate the smaller Heat Sink fan and redesign the old part cooling fan with a better duct and fan.

4. Nothing, leave it alone.

My procrastination skills are "5th Dan black belt" so don't hold your breath waiting for me to solve this in a short amount of time, but I would like to take some control back over the decisions I make about setting up a print rather than being dictated to by this crappy design.

I'm not
really asking for suggestions, look upon this as talking to myself and putting the redesign idea out there for others to take up this challenge. I will come up with a decision and design sooner or later.

Will test the new duct later. Here is the link to the Thingiverse file I chose.

https://www.thingiverse.com/thing:3255518


Sunday, 12 May 2019

Motion Activated Light Strip

While wandering around Aldi the other day, I spotted some $12.00 led motion activated light strips and decided they might come in handy.


Download the files here along with a 20x20 end cap https://www.dropbox.com/s/yo2dvalb0i9ncl8/2020%20end%20cap.zip?dl=0


I added another light tray for 10mm strips so it is about 30mm wide internally.
The original one suits 8mm wide strips.


I decided to place them somewhere on the crossbar on my CR-10 and took the obligatory measurements and committed a design to paper. 


I made a simple rectangular box to house the 8mm x 330mm pieces I cut down from the single 1m length of lights. I printed diagonally as it was decided to give the housing a final length of 360mm as it was a good size to fit on the bed and house the lights.


They fit comfortably, but I needed to figure out how to best route the wires.

A friend of mine Adz, inspired me through a close friend of his, Spiro, so I just ran it down and around the frame ;-D

I soldered the cut down strips together and am here to warn you about getting the domed clear covering hot, as it gets sticky AF and messy.


It will be mounted to the front of the cross bar so I trimmed down the silver trim on the printer to make room for the strip.


I modeled some T-Nuts about 12mm long to slide into the cross-bar to which the strip would be glued later.


I forgot to add some z-hop and ended up printing these 3 times as they kept getting knocked over lol


The T-Nuts slid into position. They were tight and hard to slide in, where the upright was attached to the cross-bar, but lose along the length of the bar ?? I think the screws joining the Aluminium together might be tight enough to be slightly squishing the bar.


To make this easy I used some spring clamps to hold a piece of thin MDF along the bottom of the bar to help with lining everything up. The idea was to place a drop of CA glue on each T-Nut and then sit the bar on that and just slide back and stick to the glue.


Tada !!!


Once the glue had set up I slid the bar out and hit it with some activator just to be sure :-)


The battery pack comes with some double sided tape so I mounted it on the bottom of the cross-bar and set it to come on automatically.


The silver warning tag really reflects the light which itself could be stronger but a battery power strip of lcds was never going to be really powerful.


Over all I'm quite happy with it and it comes on when I'm near or when the bed and print head are moving and turns itself off when it isn't.